
Would you like to find out more about loft boarding and flooring? Like, how much it costs, the different types available and whether you can install it yourself. How to convert your loft into usable storage space? If the answer’s yes then you’ve definitely come to the right place!
Who is this guide for?
- Anyone who is curious about loft boarding and would like to nerd out… welcome to our world!
- If you’re shopping around between different loft storage companies and want to see what we do
- Maybe you’re into DIY and think you can take a loft boarding job on. (Warning: it’s not for the faint-hearted!)
The estimated reading time is: 25 minutes
Guide contents
Use these quick links to jump to useful sections in this guide:
- What are the benefits of boarding your loft?
- Before you get started
- Knowing your roof design
- How much flooring do you need?
- How much does it cost?
- Types of loft flooring
- Other types of loft boarding
- Electrical cables and pipes
- Web shelving
- What about loft insulation?
- Can I convert my loft into a storage space myself?
- Working safely
- How to Board a Loft
- FAQs
- Our Conclusion

Professional Loft Services
Check out our expert loft services—designed to help you maximise your loft’s potential!
Browse All Services
An introduction to loft boarding and flooring
The Loft Boys get a lot of calls from folks who decided to have a bash at boarding their own loft. To then only realise that the job in hand is far more taxing than they first thought!
Lugging big hefty loft floor boards from the front garden up the stairs, and then into the loft is a large job in itself. Never mind then having to contend with manoeuvring the gear about up there whilst walking on floor joists. All whilst trying not to put your foot through the ceiling in the process (it happens a lot)! This makes the task a little more daunting than first imagined. Throw in the deep insulation found in many a house these days – that sits a lot higher than the top of the joists – and it certainly gets many head-scratching sessions going. Therefore many people admit defeat at this stage.
That being said, it is possible for DIYers to take on aspects of this type of work. But it’s definitely not for the faint-hearted as you’ll see.
Loft boarding is what we’re good at!
The Loft Boys have specialised in flooring lofts for storage since 2009. And there really isn’t anything that we haven’t seen or dealt with before. In fact, each member of The Loft Boys’ team spends approximately 2,000 hours a year carrying out this task!
We have got it down to a fine art. We’ve done this through years of trial and error, trying to establish the safest and easiest way to get lofts boarded. We now firmly believe that we’ve achieved this. And we want to help everyone who is looking to complete this job themselves by sharing our trade secrets.
Below you will find guides for each stage of the job. This will aid you in creating that storage space in the loft with ease.
What are the benefits of loft boarding and flooring?

There are lots of benefits to loft boarding and it’s growing more and more popular. Especially for people with growing families who either don’t want to move or find the cost of moving intimidating. Loft boarding can provide numerous benefits for both you and your home. Here is a list of six main benefits:
1. It creates extra space
You already know this one, as it’s the most obvious reason for boarding your loft. What you maybe didn’t know is that it can create upwards of 50% extra usable space. Think about that. How many other areas of your home would you be able to de-clutter with that extra space?
2. Storage made easier
Many lofts are already used for storage, so you might not see the point of loft boarding your loft. However, lofts tend to be unsuitably designed to get the most out of them. Storing items in your loft can be a difficult and hazardous task. Usually whilst you’re standing on the ladder and trying to move items around! Boarding your loft will not only provide you with extra space. If you also get a purpose-built loft ladder installed, getting the items up there will also be much easier (and safer) too. Awesome, right? After all, you’ll be able to go into the loft itself, and not have to perch precariously on a ladder!
We even take this concept further by installing shelving solutions for some customers. This involves building simple but highly useful shelves so that you can store items above the loft floor level. We use the structure of the roofing timbers to do this safely and you can imagine how much extra storage space this adds!
3. It helps to prevent heat, and money, loss!
When you have loft boarding installed, extra loft insulation is usually put in place at the same time. That brings it up to the government-recommended standard of 270mm. Doing so could save you a whopping £590 per year! (updated for 2023!) That will help to keep your home warmer in winter and cooler in summer and save you money at the same time. So boarding your loft properly can help your home become more energy-efficient as you’ll be using less energy to heat it up. Who doesn’t like saving money?
4. It helps to increase the value of your home
With storage space in the UK at a premium, the more space you have in your home, the more it’s worth. And the associated energy-efficiency gains add to that. And this is exactly what loft boarding provides for you. Having that extra space, whether it’s for storage or for everyday use, can really make a difference in the value of your home. We’ve got a blog post about home value here.
5. It’s better value than self-storage
The typical cost of using a self-storage facility, for no more than 7 m2, would be around £140 a month – and that adds up to £1680 a year.
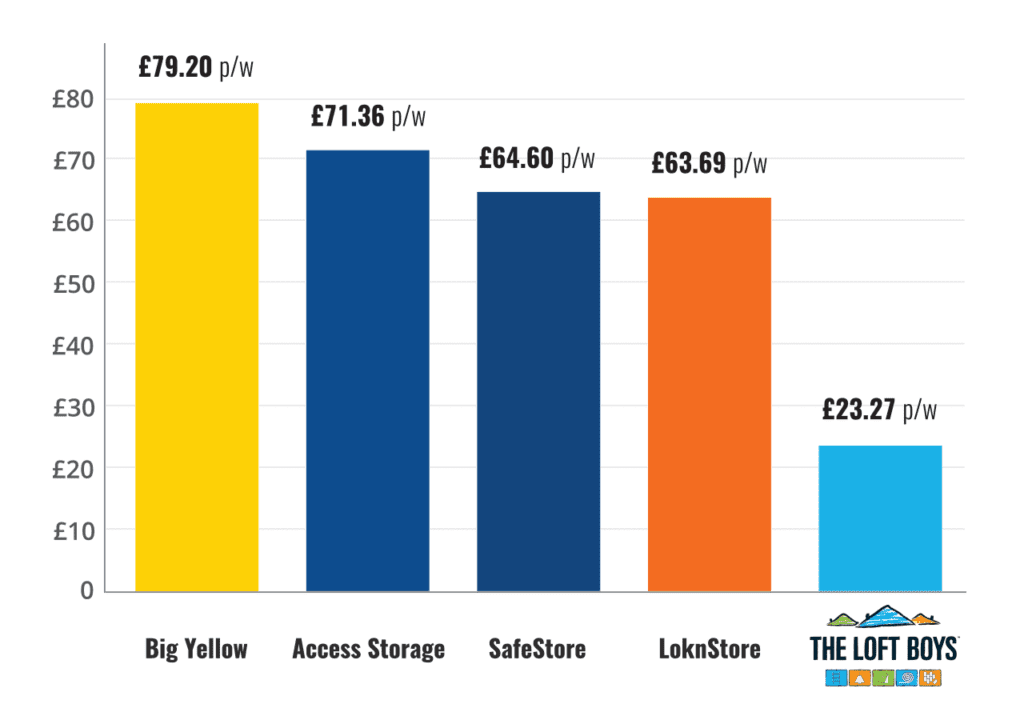
See how we calculated these figures here: More on how loft storage compares to self-storage
6. You could even make money by renting out your loft space!
Yep, you didn’t misread that. There are companies already offering to help you rent out the free space you have in your home. Including in your loft! You can earn up to £150 per month with Stashbee which is one such company we found. Not bad aye?
Installing loft boarding yourself is tough, back-breaking, work!
Doing it the wrong way could cost you dearly – you could create a safety hazard in your loft space and even reduce the value of your home.
Contact the experts todayBefore getting started… a little flooring forethought helps!
There are a few things to consider before you dive straight into boarding the loft. Those things will have an impact on the work needed to complete the loft to a professional standard.
Listed below are the main points to consider before picking up that saw and drill:
- The design of the roof
- Deciding on the size of the boarded area
- Electrical cables & pipes
- Insulation – existing or which types you need to consider
- How to work in a loft safely
- Personal protective equipment (PPE)
- Which tools you’ll need
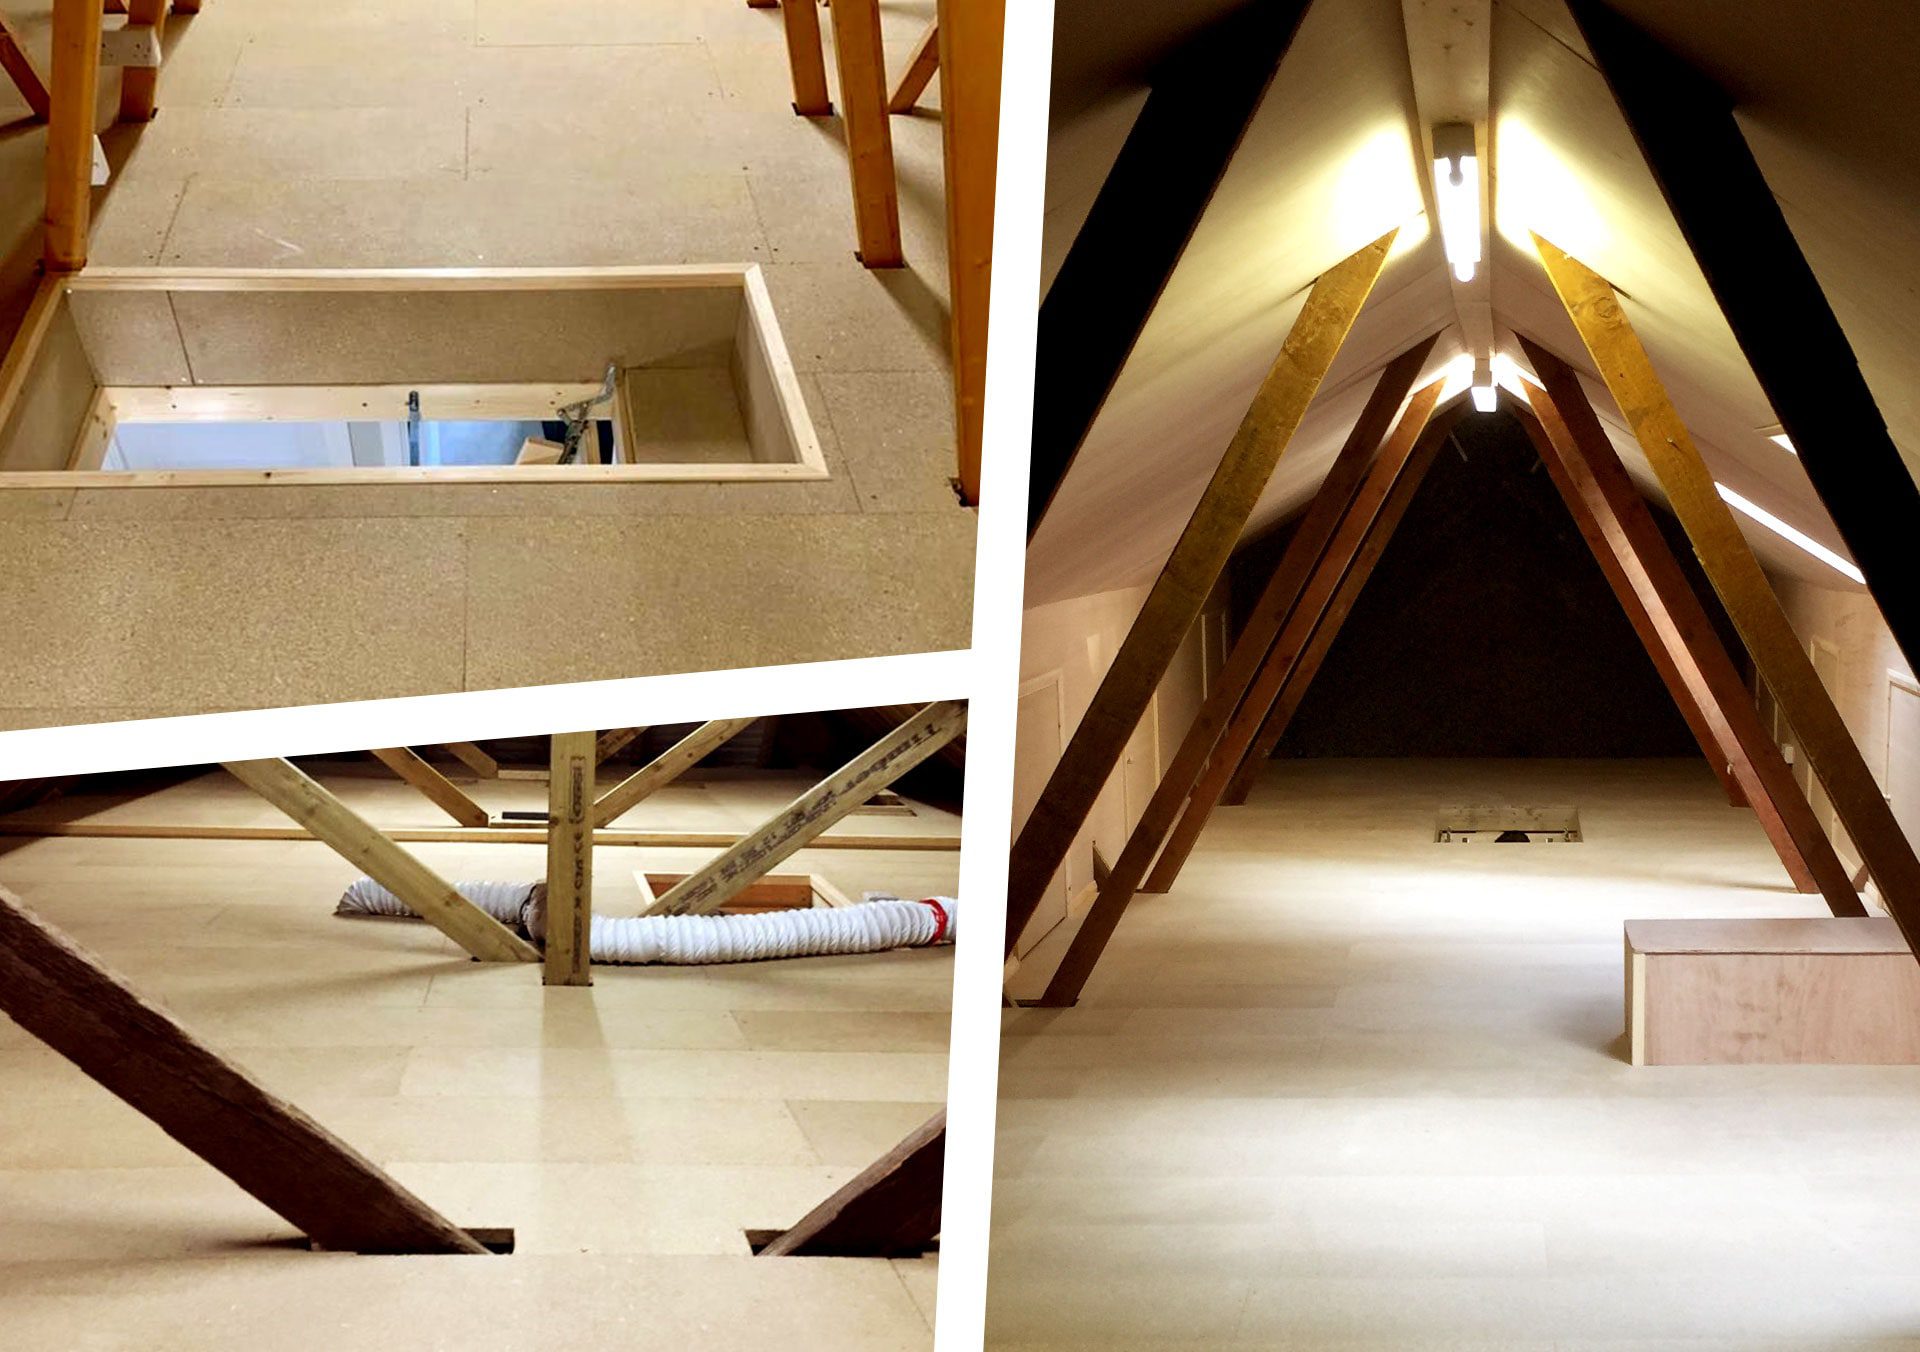
Consider your roof design
Deciding on the area of the loft to be floored can in large part be dictated by the design of your property’s roof construction. It can also dictate what will need to be done to complete the job.
Joist and rafter roofs
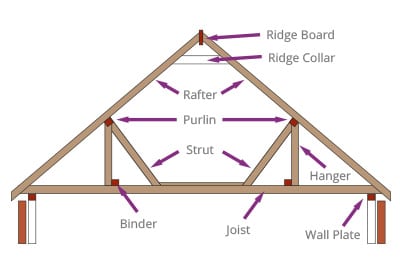
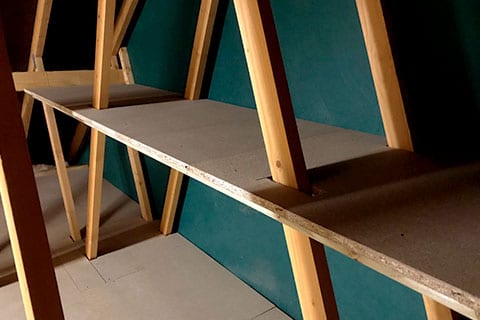
Older properties with a joist and rafter roof construction will usually allow more flexibility. These are favoured by The Loft Boys because they are usually large open spaces. And with few obstructions other than tanks and diagonal roof braces. You will usually find that these properties will allow for larger floorboards to be used (8’ x 2′). This reduces the amount of cutting needed greatly. The only issue you may find using the larger loft boards is getting them into the loft itself. It may be best to call that favour in from your neighbour now!
Trussed roofs
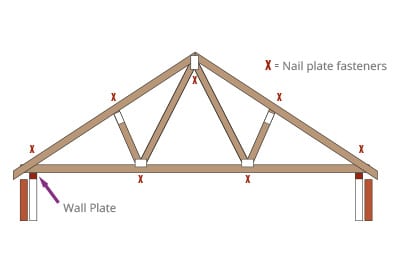
Houses built in more recent years usually have trussed roof constructions. These tend to restrict the usable floor area and involve a lot more work notching the boards to sit neatly around the central points of the roof construction. The Loft Boys favour the smaller loft packs for these jobs as we are able to manoeuvre the boards around easier and get the cuts nice and tight.
A little word of advice here… to get a professional finish, try to cut the boards in between the roof trusses rather than butting them on each side and then bridging the gap. Take a look at our gallery of work under the loft flooring section and you’ll see how the pros do it. Okay… it takes a little longer and adds a few more cuts but the end result is more than worth it.
Now for some shameless self-promotion!
We really hope you love this guide so far and are finding it useful (have you checked out our other guides yet?). If you’d like to know how we can get your loft from MEH to YEAH in 10 easy steps, watch this video:
How much loft flooring do I need?
It’s a good question, and we get asked this a lot! Deciding on how much of the loft area to board depends on a couple of factors. The first is how much you intend on storing up there, and please do take into consideration how much more stuff might end up there compared to what you have currently.
It really does spoil the experience of a usable loft space if it is jam-packed with gear, so much so that you end up not using it as you are unable to move about and retrieve what you are looking for. Therefore we always try to advise people to utilise parts of the eaves (the edges where the roof meets the wall) in the loft to actually store their items leaving the central area clear to enable you to move throughout the loft easily.
Don’t get more than you need!
Some people opt for a small area just around the perimeter of the loft hatch. This allows them to climb the ladder and retrieve their items without actually entering the loft. This is fine if you only have a few items to store up there but again, should the amount of items increase, the overhead of extending the boarded area is greater than doing the job initially.
The next factor to deciding how much of the loft area to board is what your loft will accommodate. It is absolutely pointless wasting your time and money boarding an area of your loft that will never get used. Even if you’re looking to maximise on the loft floor space we always try to convince people not to bother boarding right into the eaves. Where the pitch of the roof meets the floor reduces the usability of this area hugely.
You could save many square metres of boarding needed by reducing the loft floor area by 500mm on each pitched roof elevation. What is the point of paying out for an area that will never serve any purpose?
Leave a little space
We also try to advise that a 2” (50 mm) upstand is attached around these exposed edges. This will stop any small boxes or items from being pushed off the new loft floor boards and onto the ceiling below.
Boarding your loft doesn’t have to be an all-or-nothing affair. You may not have enough stuff to fill the entire loft, and in any case, there are likely to be areas unsuitable for storage – right into the eaves, for instance. All you need to do is measure up how much you need to have boarded and leave the rest bare.
How much does loft boarding cost?
If you’re going to buy boarding to do it yourself, 18mm chipboard costs as little as £10 for a sheet of 2400m x 600mm. Insulation boards tend to average around £20 per sheet (and then you need the chipboard as well).
After the successful completion of thousands of loft jobs, we’ve established that 15-20m2 of floor space tends to prove sufficient for normal loft storage requirements. For a better idea of how much this quantity would cost to have installed – along with a ladder – have a look at our typical loft packages.
Need a quote for installing attic floor boards?
We just need to have a chat to run through your requirements before booking your free survey.
Fill in the contact formThe different types of loft boarding and flooring
There are various ways of going about boarding your loft. Some are simpler and cheaper than others, but, as is often the case, these can have drawbacks. The main approaches are:
Laying chipboard directly on the joists
This is cheap and can be done by an expert DIYer. This doesn’t leave any room for the recommended insulation depth of 240-270mm, though. And what insulation is possible will be squashed down, not allowing enough airflow to prevent condensation.
Insulation boarding
An alternative is to buy insulation boarding which is laid over the joists. This is done to make up the insulation depth, then laying the chipboard over it. However, insulation boards are expensive and don’t solve the airflow problem.
Using counter battens
The floor level can be raised by attaching counter battens to the top of the joists. And then laying the boards on top. This will allow enough space for insulation and airflow.
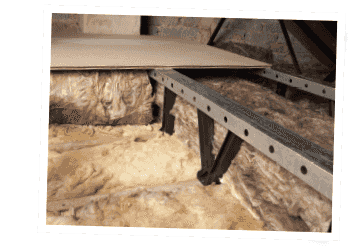
The LoftZone StoreFloor system
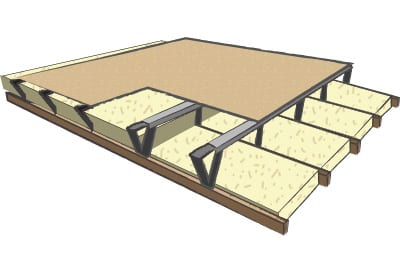
A variant of this is to use a raised floor system, such as the awesome LoftZone. This is an expert job to fit but will give you a professional finish and it takes care of airflow.
LoftZone StoreFloor is a unique, patented, modular system. It’s been designed to protect the insulation underneath it whilst providing a safe deck for access and storage. Its strong components and design allow StoreFloor to be the only loft floor system that complies with building regulations.
Why try LoftZone?
LoftZone does what traditional loft boarding procedures can’t! Not enough for you? Ok, let us tell you why:
- It allows you to maintain the full height of your insulation (to Government guidelines of 270mm without impairment)… with no squashing (which is a massive no-no)!
- It maintains airflow between the underside of the flooring and the insulation (stopping the build-up of condensation and all associated problems).
- It’s independently tested for safety giving you absolute peace of mind.
- Its stored load per square metre is 25kg.
- Winner of the ‘Best New Product’ category at the Ideal Home Show & backed by The Carbon Trust.
Read on: More about LoftZone StoreFloor
Other types of loft boarding
As well as wooden loft boarding installed to cover the floor of your loft, you might also consider boarding off areas that would be too difficult to access anyway. As we already mentioned above, due to the pitch of the roof it’s often not worth installing loft flooring right up to the eaves so we give our customers the option to have this area boarded off – with small doors installed for access if needed. Doing this creates a nice clean finish and can also help to insulate your loft from the extremes of heat or cold.
Upstands
Upstands are wooden battens that are added to the outside edge of the loft floorboards. They are a great way of stopping boxes and stored items from sliding off the boards and onto exposed areas of insulation.
Finishing
At The Loft Boys, we love details. And finishing off any loft job is one of our favourite times because we get to work on all the finishing touches. That finishing can include skirting which are sections of boarding that are added to the sides of the hatch opening. We then also add trimming which is put around the corners where the skirting and the floor meet.
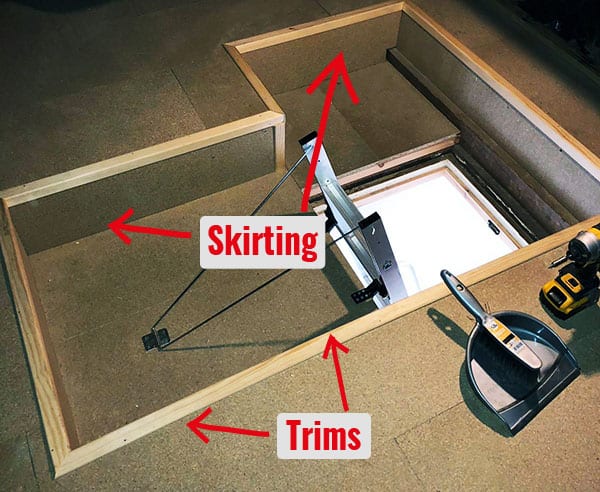
Both these things tidy and neaten up the loft and make it less likely you’ll get splinters on your hands when getting in or out of the loft.
Electrical cables and pipes
In any loft, old or new, you will find the electrical cables feeding the lighting for the rooms below travelling across the top of the joists. Many times in the past, we’ve witnessed people cutting into the ceiling joists to lower the cables and allow for boarding to be fixed on top.
The Loft Boys never do this and do not recommend this at all. Ceiling joists are there mainly to carry the ceiling below and are not like the construction of purpose-built floors. When boarding a loft to store items, you are adding weight to these timbers and cutting into them to accommodate electrical cables will interfere with the integrity of these joists. A big no-no for The Loft Boys!
As standard, The Loft Boys raise the finished loft floor above all wires and cables; and we highly recommend you do this if you’re having a boarding session yourself. Another little tip here… if using loft panels (you’ll find the smaller ones in your local DIY store) you should fix them at 610mm centres, larger boards (8’x2’) fixed at 600mm centres. This will reduce the workload massively and you will find the install takes a lot less time.
Web shelving
Web shelving is a fantastic way to achieve additional storage capacity within the loft of a trussed roof property. If that sounds too technical, let me explain. Trussed roofs are made up of diagonally placed rafters that fill more of the central space of the loft (and they are also more common in newer properties). This tends to restrict the usable floor area. But with web shelving, you can avoid the cost associated with extending the flooring space by adding shelves that sit within the rafters. Older properties with a joist and rafter roof construction, on the other hand, usually allow more flexibility for storing items on the floor.
What about loft insulation?
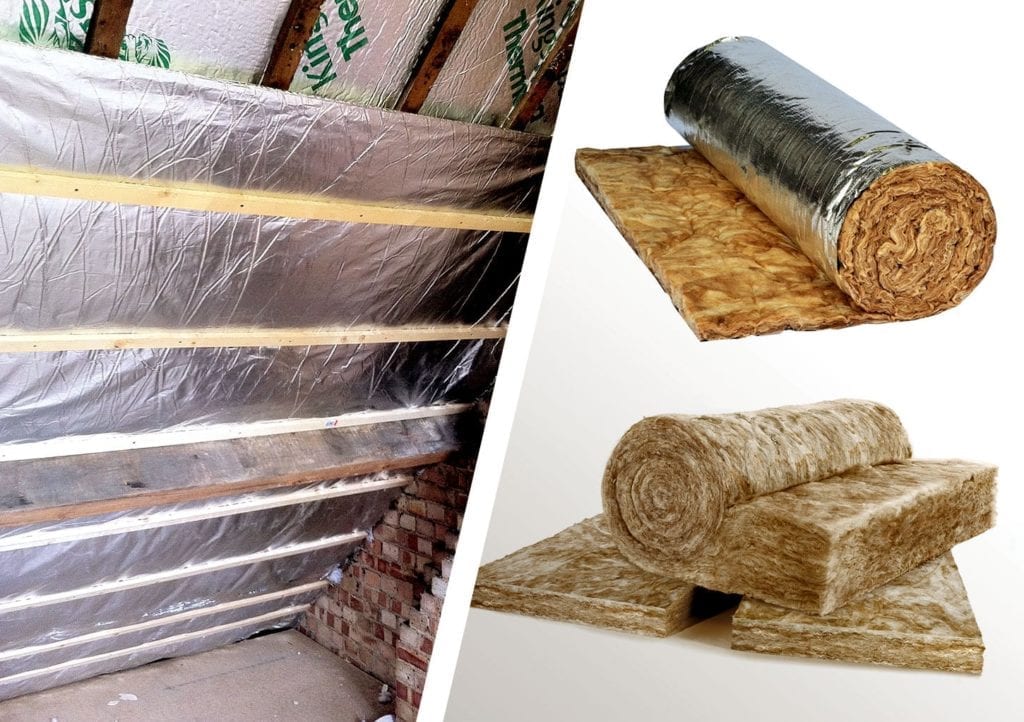
When taking on a new loft boarding job, how to deal with existing loft insulation is a really important consideration. We come across badly installed insulation all the time so it’s essential to figure out whether your current insulation is correctly laid and at the recommended thickness. That recommended minimum thickness is 270mm, but this has increased dramatically in the past few decades. Therefore, if you have old insulation, it probably won’t be thick enough.
For more info specifically on loft insulation check out our ultimate guide.
A cold or warm loft?
If you’re simply using your loft for general storage, a “cold loft” is fine, whereas if you’re storing items sensitive to temperature changes or planning to spend time up there, you’ll need a “warm loft”. These terms are actually misleading – a cold loft can be hot in summer and cold in winter, while a warm loft’s temperature is easier to control.
Basic loft insulation, which is required for either a warm or cold loft, is inserted between the joists or rafters. This may then be boarded over, but 270mm will probably come up over the joists. Therefore it’s important to raise the boards, to prevent restricting ventilation and overheating electricity cables. Leaving a gap between the top of the insulation and the underside of the loft boarding is essential for keeping air flowing and stopping the build-up of condensation.
For a warm loft, you also need insulating material on the underside of the roof. This is another type of job that we do regularly and when it’s covered with boarding can create a nice clean finish.
Does boarding the loft help insulation?
No, only when the boarding is combined with a good quality insulation material such as mineral wool will you achieve a properly insulated loft. In addition, there must be a gap between the boarding and the insulation to allow for proper airflow, otherwise, condensation and its related problems could arise.
Can I convert my loft into a storage space myself or should I leave it to the professionals?
The simple is yes, if you know some DIY and are handy on the tools then this could be a job you could take on. It’s not for the faint-hearted though and working within any loft, particularly in hot weather, is no joke. It’s something you should heavily consider before taking it on yourself.
We found this helpful video created by the good people over at DIY Doctor which shows how to install the LoftZone Storefloor system.
Working in your loft safely
At The Loft Boys, we take the health and safety of our loft installation teams extremely seriously. So if you’re planning on doing any work in your loft there are several safety issues to consider before getting started.
- If working within an un-floored loft space then crawl/kneel boards are to be laid to enable safe movement. These can be temporarily fixed in place to eradicate the risk of creating traps or movement.
- Try to ensure that the loft is well-ventilated and free from condensation.
- Ensure that the loft is well-lit so you can see exactly what you’re doing. Ideally, try to use several LED lights in various locations – LEDs won’t heat up and give off a powerful bright white light.
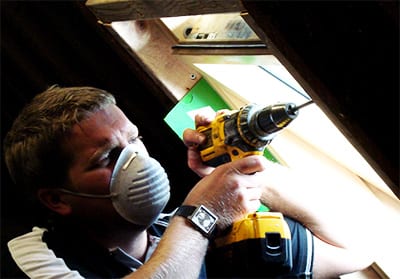
- Wear a protective face mask to prevent breathing in dust particles. 3M is generally considered the market leader but a quick search for ‘Dust Masks & Respirators’ will give you plenty of options.
- Crawling around on your knees for any amount of time can get pretty gruelling so you might also benefit from using knee pads.
- If you’re not used to handling sheets of boarding you will need some gloves… watch out for those splinters!
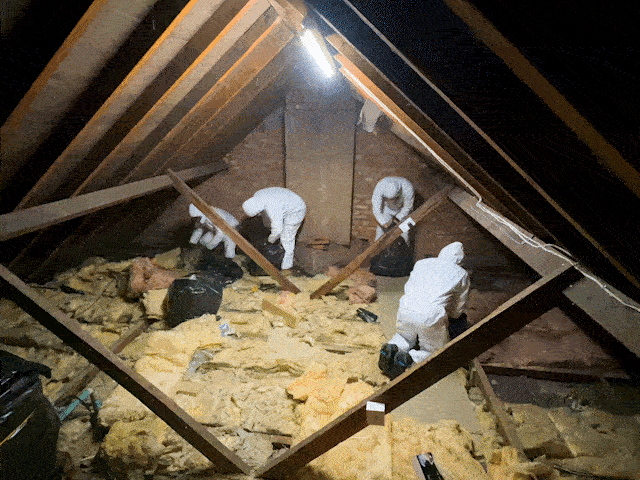
- And finally, asbestos-containing materials could be present in your loft if your home was built before the year 2000. If you suspect there is then don’t take the risk, talk to us about how to safely remove those materials.
What tools do I need?
Here are some tips on what kind of tools you will need if boarding your loft:
- Rubble Bag
- Circular/Mitre Saw
- Hand Saw
- Jigsaw
- Drill
- PZ2 drill bit
- Tape measure
- Mobile Work Bench
A Quick ‘How to Board a Loft’ Mini Guide
Thinking about transforming your loft into a nifty storage area? Great idea! Loft boarding is a savvy way to make the most of your attic space, offering a sturdy platform for storage while protecting your insulation. Before you start daydreaming about all the extra space you’ll free up, let’s dive into the how-to of loft boarding, making sure you do it safely and efficiently.
Step 1: Plan Your Space
First things first, you’ll need to assess your loft. How much space do you want to board? Remember, you don’t need to cover the entire loft. Consider only boarding the central area or a path leading to your items. This planning stage helps prevent overcrowding and maintains easy access to your stored goods.
Step 2: Check Your Joists
Your loft’s joists must support the new floor’s weight. They should be in good condition and spaced appropriately for the boards you intend to use. If in doubt, getting a professional opinion is a smart move to ensure safety.
Step 3: Get the Right Materials
For loft boarding, you’ll need:
- Suitable loft boards (often tongue and groove for easy fitting)
- Screws and a screwdriver
- A saw for any necessary trimming
- Insulation material (if you plan to top up)
Step 4: Lay Insulation (If Required)
If you’re enhancing your insulation, lay this down first between the joists. Aim for the recommended thickness of around 270mm to optimise energy efficiency but remember to allow for ventilation.
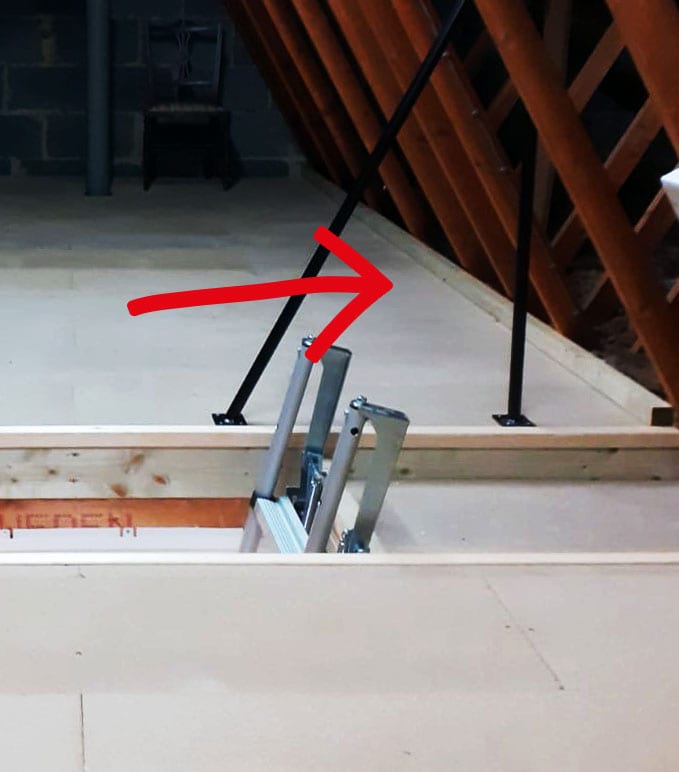
Step 5: Install Loft Legs (If Raising Floor)
To avoid compressing your insulation and to allow for airflow, installing loft legs that raise the boards above the insulation is a wise choice. These create a raised platform to lay your boards on.
Step 6: Fit the Boards
Start laying your boards, preferably starting from the hatch and moving towards the edges of the loft. Ensure they fit snugly and securely screw them into the loft legs or directly onto the joists, depending on your setup.
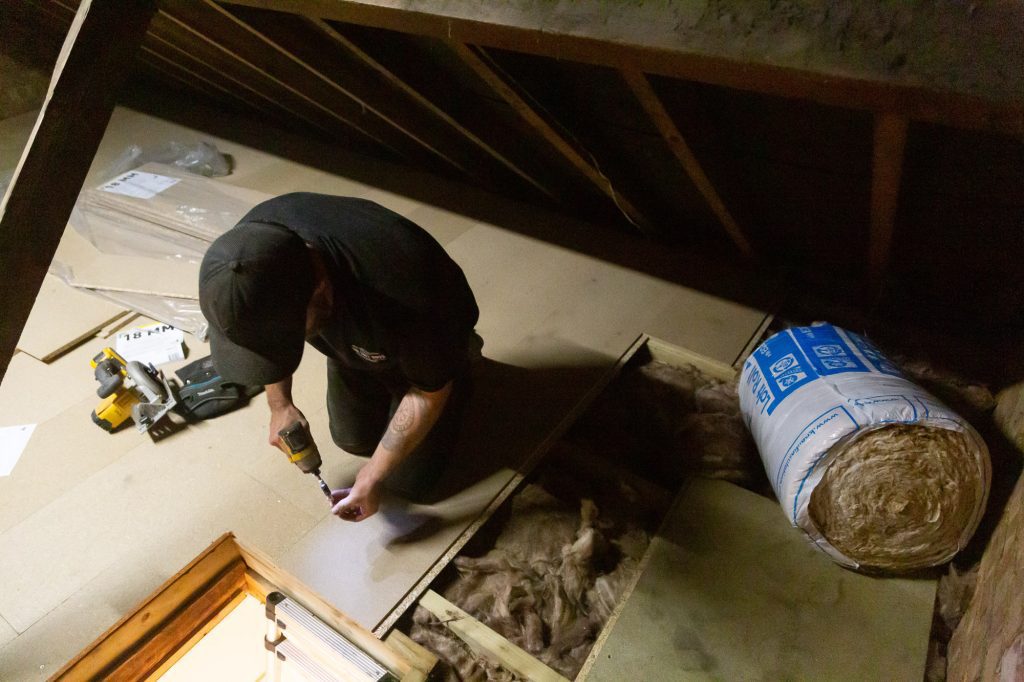
Step 7: Mind the Gaps
Keep a small gap between boards to allow for expansion and airflow. This small step can prevent issues with damp and wood warping down the line.
Step 8: Finishing Touches
Once your boards are down, you might consider adding a safety railing around the hatch or a sturdy shelf for easier storage.
Step 9: Double Check Everything!
Once everything is installed, give your new flooring a good once-over to ensure everything is secure and stable. No wobbly boards or protruding nails!
Step 10: Enjoy Your New Storage Space
Now that the hard work is done, it’s time to start utilising your new storage area. Enjoy decluttering the rest of your home and having a safe, accessible space to store your treasures!
Boarding a loft can be a rewarding DIY project if you’re handy with tools and have the time. However, it’s not a minor undertaking. If you’re not confident, it’s always better to consult with professionals like us at The Loft Boys—experts who’ll ensure your loft is boarded to perfection, safely and stylishly. Remember, your loft transformation is just a consultation away. Give us a shout, and we’ll help turn that dusty old attic into a splendid storage solution!
FAQs
No, loft insulation boards are not designed for walking on but rather are usually used to insulate the roof and placed between the rafters.
Nope, in the UK we use attic or loft to mean that room at the top of your house!
If you’re handy with DIY and up for the challenge then yes, there are now various types of loft boarding kits on the market to consider.
No, we currently use a different loft floor-raising system called LoftZone which we talk about in this guide.
Conclusion: Installing loft boarding and flooring is clearly hard work but the benefits are huge!
If you’ve read through this guide you’ll probably recognise that boarding a loft is a pretty serious undertaking. While not impossible for DIYers to take on this kind of job, we would recommend that you think through all the considerations very carefully before making a decision. The fact that boarding should be installed above insulation of 270mm thick means that this job requires good experience in working with wood.
The benefits of all that extra storage space should also be pretty clear by now. With storage space at a premium, utilising any available space in your home is a no-brainer. And doing it the right way, with properly installed insulation could save you a lot of money in the long run.
If you’re unsure of whether to take this job on then it’s worth checking out our pre-made packages which will give you an idea of how much installation costs and what you’ll get for your money. Or, head over to our package builder page for a more detailed look at the types of items we install. If you’ve got other questions about us or our services you could check out our FAQs page or just get in touch. Or read about some of the ways we go the extra mile for our customers.
Ready to take the next step and get your loft boarding installed?
Have a chat with us about getting your loft sorted out.
Fill in the contact form